line2sine manual
Contents: [
Basics |
Time |
Frequency |
Amplitude |
Envelope |
Tips ]
Basics
The line2sine program reads lines from a Diagram document
and converts these lines to sinusoids. the Diagram program can be
found at CCRMA in /LocalApps/Diagram.app .
Interpretation of dimensions
- x-axis (horizontal dimension) is interpreted as time in
seconds from left to right.
- y-axis (vertical dimension) is interpreted as frequency in
Hertz from bottom to top.
- Thickness of lines is interpreted as amplitude in normalized
units (amplitude of sound cannot exceed 1.0 at any given time
or the sound will clip). The default thickness is 0.035.
Program options
The program prompts you for several settings which are explained in
the sections below.
- duration of the output soundfile in seconds
- to interpret y-axis as being interval or harmonic space
- minimum frequency which will be the lower limit of the window
- maximum frequency which will be the upper limit of the window
- global amplitude scaling
- default amplitude envelope
- print out oscillator parameters or not
Time
Lines can be drawn in any direction and will be sorted so that they
always increase in time.
Currently, if a line changes time direction, all of the vertices
of the line will be resorted so that they increase in time. It may be
nice to change this property to the case where a time reversal in the
line will create a new oscillator track. Anyway, here is what happens
to a single line which changes time direction:
Line drawn as:

| Will be interpreted as:
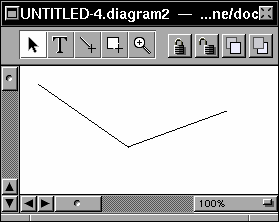
|
Note that the time-sorted line will not be drawn or visible in the
Diagram window. Also note that you can create two lines which join
at their ends which looks like the left diagram window above. In that
case, there is no problem since there are no time reversals on either
line, since they both only have two vertices each.
Increasing the width of the Diagram document
To increase the width of the Diagram document by a certain number
of pages, select Format/Page Layout (command-P) from the
Diagram menu to get the following window:
![[page layout window]](page-layout.gif) In the layout window above, the width of the Diagram document is set to
4 pages across.
In the layout window above, the width of the Diagram document is set to
4 pages across.
Frequency
There are two types of frequency space available for use with the
line2sine program: interval space and harmonic space.
In harmonic space, equal distances in linear space are mapped
directly to frequency space. For example, any pair of lines in the
Diagram document which are 1 centimeter apart will always have the
same frequency separation no matter where along the y-axis direction
they are placed. This means that equally spaced lines with respect to
0 Hertz will be equivalent to harmonics of a fundamental. You are
not allowed to use negative frequencies but are allow to alias as
much as you like. The sampling rate is hardwired to 44100 Hz.
In interval space, equal distances in linear space are mapped into
equal size intervals. For example, any pair of lines in the Diagram
document which are 1 centimeter apart will always have the same
musical interval relation no matter where along the y-axis direction
they are placed. When using Interval space, you cannot use frequencies
below 20 Hz.
Separate frequency tracks
You can have several frequency tracks which run in parallel by adding
more tiling page rows to the Diagram document. Each page row has the
same frequency range as the first row. These rows allow for editing
simultaneous independent textures with greater ease, and eventually
can be used for different instruments. To increase the number of page
rows in the Diagram document, go to the Format/Page
Layout window (command-P) and increase the number of pages down.
You can use command-Y to hide/show the horizontal page breaks which
will be the borders between tracks.
Amplitude
The total amplitude at any given time cannot exceed 1.0; otherwise,
clipping will occur in the output soundfile. There are several ways
to control the loudness of the sound.
Global amplitude control
The line2sine program prompts for a global amplitude. This
amplitude scales the amplitude of all sound in the output soundfile.
Values greater than 1.0 will make the sound louder; values less than
1.0 will make the sound quieter.
The line2sine program also prompts for a default
amplitude envelope. This envelope will be applied to all lines which
do not have their own local amplitude envelope. See the envelope section below for how to make an
envelope.
Local amplitude control
The thickness of a line controls the relative loudness of that
line to other lines in the Diagram window. to change the thickness of
a line, click the  button on the
toolbar at the top of the Diagram window. Then select a line to change the
amplitude of, and select the
button on the
toolbar at the top of the Diagram window. Then select a line to change the
amplitude of, and select the  button. This will open up the style inspector as shown below:
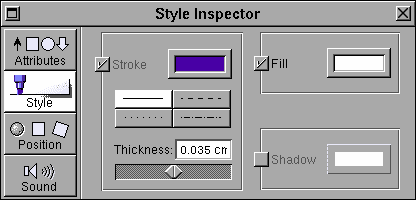
The amplitude units are specified in units of centimeters.
You may be using other measurement units according to Preferences.app.
If you would like to change to centimeters in the thickness window,
then open /NextApps/Preferences.app (usually second icon in your
dock), then click on the  icon
and set measurement units to centimeters. You will probably have to
restart Diagram.app in order for the change to take place. The default
thickness of a line is 0.035 cm.
icon
and set measurement units to centimeters. You will probably have to
restart Diagram.app in order for the change to take place. The default
thickness of a line is 0.035 cm.
The global amplitude envelope for lines can be overridden by
attaching a local amplitude envelope to a line.
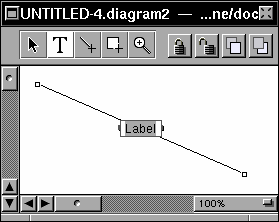
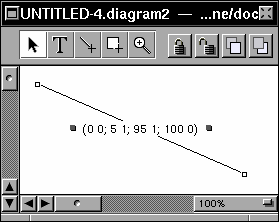
double-click on a line to create a label:
Note that you can hide the local amplitude envelope by setting its
width to 0.
Envelope
Envelopes for this program are pairs of numbers separated by
semi-colons and enclosed in parentheses. Each pair of numbers
represents a time, value pairing. The value in this case can
represent either amplitude or frequency. The frequency envelopes
for the line2sine program are generated automatically, so you
can only change the amplitude envelopes. Here is an example
triangular window:
(0 0; 1 1; 2 0)
|
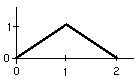
|
The duration of the above envelope is relative, and the envelope will
be stretched to fit the whole duration of a line. You can also place
a sustain point in a line by using the s command, for
example:
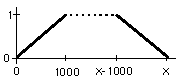
(0 0; 1000 1; s; 2000 0)
|
|
This amplitude envelope will ramp up to a value of 1 over a span of
1000 samples. If the length of the line is more than 2000 samples,
then that value of 1 will be held (hence "S"ustain point) until 1000
samples before the end of the line, where the amplitude value will
decrease from 1 to 0. Currently the envelope is ill-behaved(?) when
the time is less than 2000 samples. For example if the line lasts for
1000 samples, then the amplitude envelope will go from 0 to 1.
There are several types of interpolation available:
- L = Linear interpolation between points in the
envelope.
- G = Geometric interpolation between points in
the envelope. This is linear interpolation on a decibel scale
or interval scale. You cannot include a zero point in the
envelope when using this interpolation type.
- C = Constant interpolation. the envelope
points are not interpolated, but instead each value is held
until then next point in the envelope.
You can control the interpolation on two levels, the first being
the default interpolation for the entire envelope, for example the
envelope below will be geometrically interpolated:
g(0 0.0001; 1 1; 2 0.0001)
The default interpolation is L. Currently there is a
bug such that you cannot set the default interpolation type
for local amplitude envelopes.
The local interpolation between points can be controlled by
placing the interpolation letter after the first pair to be
interpolated:
(0 0; 5 0.1 g; 50 1; 100 0)
This envelope is interpolated linearly, except between time points
5 and 50 where geometric interpolation is used.
Also, you can optionally use commas in time-value pairs:
(0, 0; 1, 1; 2, 0)
Note there is a bug in the envelope string which will be fixed
eventually: you must place a zero before the decimal point for
numbers less than 1.
Tips
Coarse/Fine movement
Use command-, (command comma) to switch between coarse and fine
movement in a Diagram document. You can control the coarseness
by using command-# (command pound) and adjusting the grid spacing.
Making harmonics
The easiest way to make harmonics is to:
- Set the number of page rows to two across.
- Draw a horizontal line exactly at the base of the
first page row. Use 200% magnification.
- Copy the line with command-c, and then paste the line
with command-v.
- Move the pasted line to the position of the desired
fundamental frequency. Make sure that the pasted line
starts at exactly the same time as the original line.
- Now press command-v for as many harmonics as desired.
- Erase the original line.
- Set the page rows back to one across.
- When using line2sine, set the interpolation to
frequencies (linear), and set the minimum frequency of the
Window to 0 Hz. The upper limit frequency will determine the
actual pitch of the note.
Making a musical "staff"
- Type command-# to open the Grid panel.
- Type command-P and select two page rows across so that you
can see the lower limit of the top row of pages.
- Select a grid size to represent enough chromatic steps.
Make sure that the grid aligns exactly with the bottom of the
first page row. You may want to set zoom to 200%, and you may
also need to type in the grid size to do fine adjustment to
the grid size.
- Now each grid line represents a chromatic frequency
(or quarter-tone, etc.).
- When using line2sine, use interval interpolation, and
set the minimum and maximum frequency range to particular
notes on the grid. For example, if you have 12 squares in the
vertical direction, then there are 13 grid lines. Each line stands
for a chromatic note, so the relation between lower and upper
frequency ranges will be an octave.
See Example 10 for an
implementation of these directions. Here is a table of notes near
middle C (C4):
   A4  = 440.000
   G#4 = 415.305
   G4  = 391.995
   F#4 = 369.994
|
   F4  = 349.228
   E4  = 329.628
   D#4 = 311.127
   D4  = 293.665
|
   C#4 = 277.183
   C4  = 261.626
   B3  = 246.942
   A#3 = 233.082
   A3  = 220.000
|
How to rotate and scale lines
You can rotate and scale lines by grouping them. At least two
lines can be grouped together by selecting them and then pressing
command-g. To rotate the group press the
button on the Diagram tool bar, Then press the position button and
change the angle. To make the line group larger or smaller,
highlight the group and them drag one of the corners or sides of
the group. To ungroup a set of lines, press command-G.
Page Layout
The width of the Diagram document area must be exactly 10.5" (26.67 cm),
and the height must be 8" (20.32 cm). This is the default for
Diagram when using Letter size (8.5"x11") with 0.25" margins
(in landscape orientation). If you are using another type of paper
(e.g., printing in Europe), then just make sure that the dimensions
of the paper minus the margins give the document dimensions of
(26.67cm x 20.32cm). The paper size and margins are stored in binary
format, and I don't want to reverse engineer to get them.